


Field & Stream Online Editors
We may earn revenue from the products available on this page and participate in affiliate programs. Learn more ›
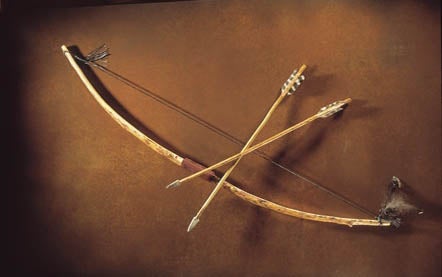
When you draw a self bow, one that you have made from the limb or trunk of a tree without laminating layers of material together, you join a brotherhood of archer craftsmen that dates back to 50,000 b.c. Anyone who possesses patience and a steady hand can take this journey. The bow I made for this article only took about 24 hours of actual build time, and it’s powerful enough to take down big game.
Step 1: Make the Stave
Because green wood is too spongy to launch a fast arrow and dead wood breaks when bent, the ideal stave for a self bow is carefully seasoned. A dying tree limb that resists breaking and maintains its spring can work in a survival situation, but if you have the time, start with a living tree or a limb from 11/2 to 5 inches in diameter. The best woods include osage, Oregon yew, white ash, Southern red cedar, black walnut, black locust, apple, and mulberry. The self bow I made is mountain juniper.
After cutting the tree (preferably in winter when the sap flow is down), section a 4- to 6-foot length and scrape off the bark, taking care not to cut through the outer growth ring, which would create a weak spot where the bow can break. Don’t cut through knots; instead, leave the nubs protruding. Trunks larger than 3 inches should be split lengthwise.
Step 2: Shape the Bow
Roughly shape your bow from the green stave. Using a drawknife (to jury-rig one, drive the point of your hunting knife into a block of wood that will act as the second handle), shave wood from the side of the bow that will form the belly (the side that faces you as you draw the string). If there is a natural curve to the stave, choose the outside of the curve as the belly because pulling the bow against the curve will add power. Never remove wood from the back of the bow, which would cause it to break when drawn.
Step 3: Season the Stave
Tie the roughly shaped bow to a flat board, belly side down. Recurving the tips with wedges increases arrow speed. Set the bow in a shady spot under a tarp or in a garage. Depending upon humidity, the stave will have dried enough for final shaping in two to three weeks.
[NEXT “Step 4-7”] **Step 4: Flatten the Belly **
Shave the belly flat, thinning the limbs so that they taper evenly from the center of the stave to either end. If the stave is wider than 21/2 inches, remove some wood from the sides and taper the width toward each end, but don’t touch the back. When the bow is limber enough to bend over your knee, whittle nocks 1 inch from either end, cutting into the sides only.
Step 5: String the Bow
Native Americans traditionally used rawhide or sinew for the bowstring, but nylon parachute cord or fishing line can work for a survival bow fashioned in the field. Strands of linen or Dacron make the best strings for a self bow and can be purchased at hardware stores. Twist together as many as needed for the proper thickness, then double one end and tie an overhand knot, forming a loop that is just big enough to fit over the nock. Slide this down the bow several inches past the nock. Then tie the other end to the opposite nock.
Step 6: Go To The Tillering Board
String the bow loosely and place it on a tillering board (a wooden frame with nails driven at intervals to hold the bow at various draw lengths). Draw the string and mark the bow where either limb resists a progressive curve. Remove wood from the belly at these places until both limbs bend evenly. Continue tillering until the bow can be drawn far enough to shoot an arrow half as long as the bow (with most woods, this will be a 35- to 55-pound pull).
Step 7: Finish the Bow
You can strengthen your bow by applying strips of sinew from deer backstraps or leg tendons to the back of the bow with hide glue. Sinews need to be dried, shredded, then placed in cool water before gluing. Just remember that a self bow, even one that is sinew-backed, is likely to break if pulled to the point that modern archers consider to be full draw.
For more instruction, I recommend the video Primitive Bow and Arrow by John McPherson ($30; 800-258-1232; prairiewolf.net).
The Arrows
Making arrows is satisfying, though it takes more time to craft a few good arrows than it does to make a bow to shoot them.
1. Collect straight, green, knotless sticks 3/8 to 5/8 inch in diameter (willow, dogwood, cedar, fir, ash, chokecherry). Bundle them together to reduce warping and let them dry for a couple of weeks.
2. Drill a 1/4- or 3/8-inch hole in a block of wood and whittle or sand the shafts to exactly fit the hole.
3. Straighten by holding one end of a shaft over steam or a small fire until it’s pliable, then applying pressure to remove kinks.
4. Whittle a nock at one end of the shaft and a deeper notch at the other end for the point.
5. Split the vanes of feathers to fletch the arrow, securing them with glue or tightly wrapped threads of sinew. 6. Affix points with glue and sinew. Knapping stone points takes skill, but those filed from bone or antler work nearly as well.
Read the full article here